Tools for Creating Teaching Videos
Record, edit and share videos
With our tools for creating teaching videos, it is possible to record and edit teaching videos and embed them in courses, or send them to course participants. On this page, we introduce you to selected and proven programmes for these three steps.
The central video platform for embedding and playing finalised teaching videos is GrypsTube. From there, the teaching videos can be embedded into Moodle courses.
Record videos


PowerPoint
Create PowerPoint teaching videos with audio commentar
This is the easiest and probably fastest way to create a teaching video.
PowerPoint (and for Mac users also Keynote) offers the function "Record slide show" under the menu item "Slide show". This allows you to add an audio commentary to your slides and thus create a teaching video without much effort.
Then save the file as an .mpg4 file or .ppt/.pptx file (note: audio commentary will not be transferred for files in PDF format).
OBS - Open Broadcast Studio
Create screen shots and webcam videos with OBS
You can use OBS to create free videos. Live streaming is also possible. You can film all files, integrate webcam and audio commentary and use, e.g. an integrated green screen.
Opencast Studio
Create screencast videos with Opencast Studio
You can use Opencast Studio to 'film' your presentation slides in the browser, adding an audio commentary and your webcam to create a so-called screencast. In principle, it is also possible to record only the webcam if, for example, you only want to present a short topic that does not require any accompanying materials.
Create teaching videos with video conferencing systems
BigBlueButton

"Start recording" button -> Starts the recording
For a simple video recording with BigBlueButton, press "Start recording" at the top of the page and confirm your selection again. You can also pause the recording at the top of the page. The recording is saved directly to Moodle in the "lobby" of your BigBlueButton room.
BigBlueButton records the individual elements of your video conference separately, which facilitates anonymisation of participants.
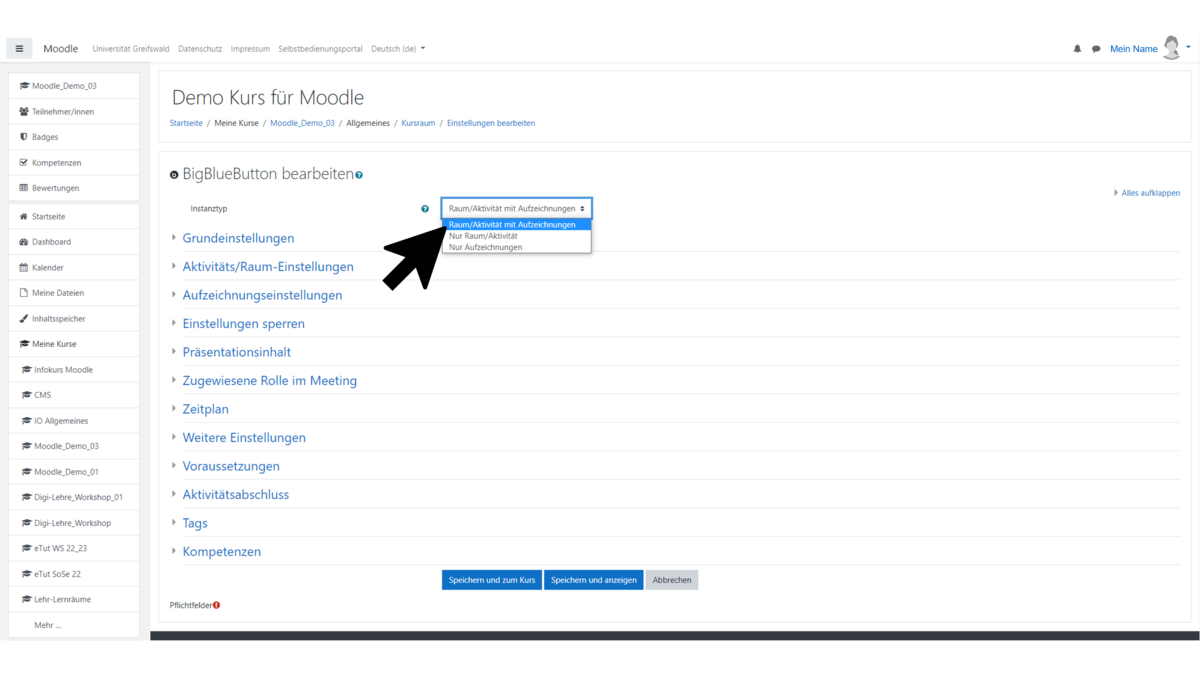
Important: Make sure that the instance type "Room/Activity with recordings" is selected in the Moodle settings of your BBB meeting room to enable recordings.
Jitsi

Further settings -> Start recording -> Starts recording
To start a recording in Jitsi, you have to select the three dots "Further settings" under the toolbar in your corresponding conference. In the list that appears, click on "Start recording".
Important: A Dropbox account is required for saving the recording!
Zoom

"Record" button -> Starts recording
As the host of a Zoom conference, you can record your online event by clicking on the recording icon in the toolbar at the bottom of the video window. In Zoom's settings, you can also make further specifications for the recording, such as recording separate audio tracks for the individual participants or optimising video for third-party editors. Furthermore, Zoom saves your video recording to a folder you specify in advance.
Video messages and video lectures via smartphone
Create your own teaching film with your smartphone or tablet
You can also create a teaching video while working from home where you, not your slides, are the main focus. All you need is a tripod, an external microphone and, if necessary, an LED light for good lighting. If necessary, use a flipchart or drawing pad to create a minimalist board substitute or show and illustrate specific models or objects.
The HOOU has produced a practical handout on this: Materials and tips for your video production [de]
Edit videos
Jupyterhub
Kdenlive, Shotcut and others
Jupyterhub is a cloud-based work and programming environment. It allows access to and editing of all data stored there from any computer and browser. Jupyterhub also offers a special work environment for video editing and processing.
Further information on the technical side of Jupyterhub is available from the University Computer Centre.
To access the video editing environment:
First go to Jupyterhub and log in with your university user credentials.
Then select "Video editing" from the server environments so that the appropriate desktop/work server can be created for you.
By clicking on the home icon at the bottom left and selecting the "Sound & video" tab, you will be offered a total of four different video editing programmes. These vary in their handling, complexity, presentation and scope.
Please note that files that require editing must first be uploaded to the server and cannot be accessed from your PC!

Kdenlive
Quick-start guide to video editing with Kdenlive [de] (Rund um Linux | 7:08 min)

Shotcut
Shotcut for beginners - complete guide [de] (UpBilden| 11:49 Min)
You can adjust the language after opening the software by clicking on "Settings" in the bar at the top of the page and selecting your desired interface language under "language"

OpenShot
Video editing and processing [de] (Sebastian Stoll | 6:03 Min)
Flowblade
Camtasia
Explanatory videos, teaching videos, class recordings and more
Developed by the company TechSmith®, Camtasia can be used for direct screen recording and video editing. The user interface is clearly laid out, which means that it does not take long to understand how the software works and gain an overview of the features it provides.
Camtasia offers a generous repertoire of ready-made graphics, illustrations, assets, cursor effects, music and backgrounds.
Fun fact: Our tutorials are also created with Camtasia.
While a full version is subject to a fee, TechSmith® also offers a 30-day trial version.
Tips & support: digitale-lehreuni-greifswaldde
Share videos


Grypstube
Upload and share videos

The central web-based video service GrypsTube provides university members with an open platform for videos of all kinds. If you have a user account, you can upload, share and save unlimited videos to playlists on GrypsTube.
The University of Greifswald’s video platform GrypsTube is available here: https://grypstube.uni-greifswald.de/.
Upload the teaching video
Then upload your video file to tour own portal 'GrypsTube'.
Please note that you can uncheck "allow download" under "advanced settings” when uploading the video to GrypsTube. Under "Basic info > visibility" you can select "anyone with the private link can see this video" and then share the link exclusively in a (password protected) Moodle course. That way, the video is not publicly accessible.
User account and access to the videos
You do NOT need a user account to watch, share and download videos on Grypstube.
To upload videos and create playlists, you can apply for a user account via the central account management.
For more information, please contact the University Computer Centre [de].
Embedding videos in Moodle courses
The embedding of Grypstube videos is mainly done via the corresponding link to the video (URL), via an embedding code or via QR code. You can also make further adjustments, e.g. to start the video at a certain point or make the video a loop.
More information is available here [de].
Provide teaching videos in the Moodle course
If possible, teaching videos should be integrated into a Moodle course for the class and round off the teaching concept with suitable exercises, assignments or quizzes on the content of the video.
To do this, the video must first be uploaded to a video platform. At the University of Greifswald, this is the platform GrypsTube (similar to YouTube). Embedding the videos in the Moodle course is mainly done via the corresponding video link (URL) or via an embedding code.
You can find more information on this here [de].
The following measures to engage learners help round off the teaching concept with videos:
Provide assignments
set transfer tasks to the video, e.g. have them find (similar) case studies
have handwritten notes made on the video, e.g. with key messages
have guiding questions answered about the video
Please note: Clearly formulate instructions for the task and set deadlines for required work!
Provide tests to check level of learning
use automated tests to check progress (‘Did I understand the taught content’?)
create interactive videos that are interrupted by test questions and can only be continued once the questions have been answered correctly
use final tests as a prerequisite for access to further teaching videos or learning content
Encourage reflection and exchange
use a discussion forum to answer open questions
use reflective questions to stimulate further contemplation
initiate discussions on the content of the video
have joint solutions developed for problems or tasks
Video tutorial: How do I upload teaching videos to GrypsTube and add them to Moodle?
Transfer
Sending and sharing videos with Groupware and Nextcloud
The results of projects, classes or research work that end up in media products often also want to be seen! Your finished video, audio, object or text files now need to be made accessible, shared, sent, uploaded or embedded.

The Groupware webmailer allows you to transfer files up to 25 MB to other recipients.
This makes it difficult to send video files that are rich in content via email.
More information is provided by the University Computer Centre here [de].
You can usually compress your files by selecting low quality settings when exporting your finished file in programmes such as Shotcut, MovieMaker or Camtasia, or by searching for converters/compressors on the internet.
(however, this can not be recommended due to unwanted loss of quality or websites containing pushy advertising).
On the other hand, Nextcloud can be used for storing and sharing a wide variety of data because it is a web-based software.
Each university member can log in with their user ID and has 10 GB of storage.
An integrated OnlyOffice document server makes it possible to edit and share text, spreadsheets or even presentation files simultaneously.
If you want to share a folder or a single file, proceed as follows:
Click on the "share" icon next to the element to be shared (Fig. 1).
A window now appears on the right in which you can
1. directly specify the name/email of the person who is allowed to access this item
2. or configure a link that gives others access to this item (Fig. 2).
You can edit the access rights yourself and determine, for example, that users can only upload files or that access to the element has additional password protection or that the link expires after a certain period of time. You can find these settings by selecting the three dots on the far right of the "share link" option (Fig. 3). After making the changes, save the link again by clicking on the icon to the left of the three dots to copy the new link to the clipboard.
If you want to permanently work on files jointly with your team or share documents with them, you can request a group folder via the account management. Here you have the option to adjust the memory size up to 100 GB depending on your requirements and to assign special permissions.
More information on the group folder is provided by the University Computer Centre here [de].


